improveddevices.com
making things more useful
No leaky parts. No parts that corrode. Always easy to turn on and off. Frost proof. Truly problem free.
$229.99 for one hydrant
$220.79 each 2-4 hydrants -4%
$211.59 each 5-10 hydrants -8%
$202.39 each 11+ hydrants -12%
For local buyers (Northeastern Arizona) a $40 deposit for each hydrant gets your order started.
Patent Pending
EnduraEase Hydrant
This improved device is the result of over five years of development and testing in situations where it’s actually used.
I continue to make improvements in function and appearance whenever possible, as long as there is no sacrifice in quality and I can keep the price as low as possible.


The bottom bury section is gray, as a general guide to bury depth. In our standard model moss green is the color on the above-ground section.
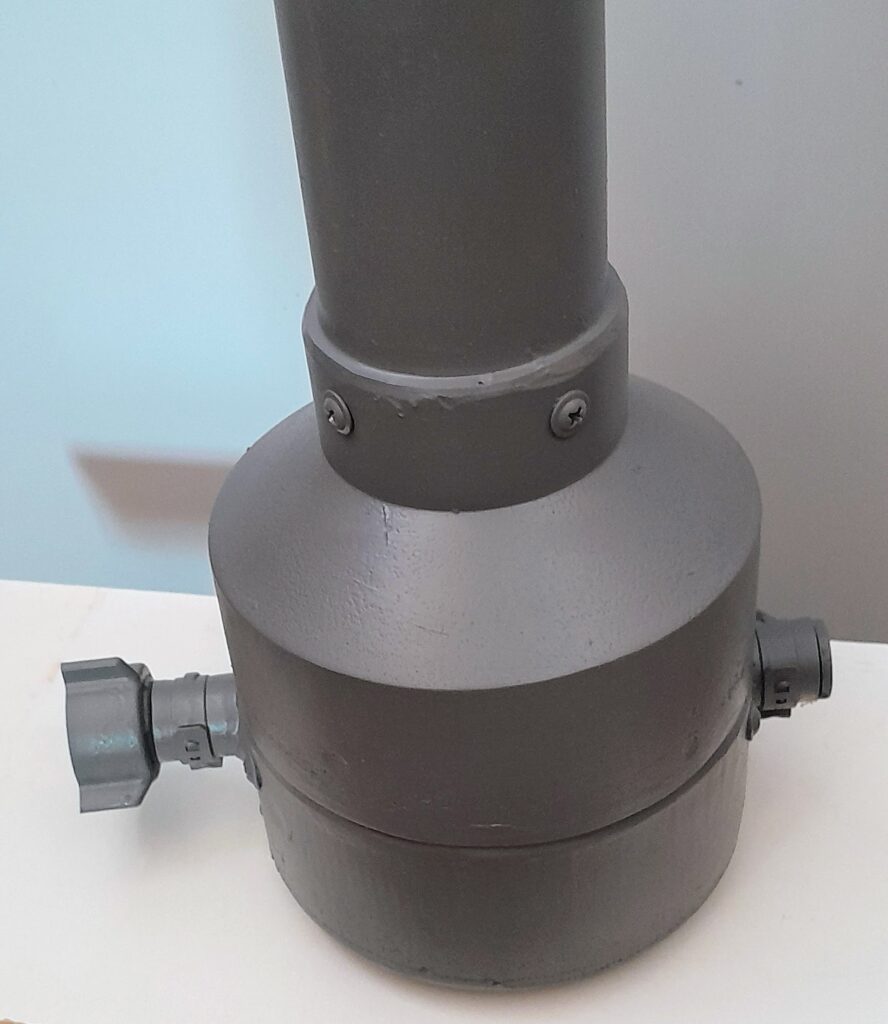
Water supply to the hydrant is attached at the 3/4″FNPT connector on the side of the valve housing not under the bottom of the hydrant.
What’s new about the EnduraEase Hydrant?
Just imagine a year-round water hydrant for your outdoor plants and animals that’s leak free, corrosion free, and always easier for everyone to turn on and off. That’s what I did, and the result is the EnduraEase Hydrant. It works well.
Two things are different about this hydrant.
– The functional design is much better than the design used in the hundred year old traditional hydrants.
– The materials used are suited to frequent and prolonged exposure to water and soil, whereas the steel in traditional hydrants is not.
The first frost proof yard hydrant patent was granted in 1913. The next notable improvement was in 1966 when a patent was granted for a pump style lever handle. They became popular because they made it easier to get water closer to where it was needed year round for outdoor plants and animals. So, for over sixty years these hydrants are what most people have used and continue to use, mostly because there has been no alternative.
However, these hydrants have had problems since the beginning. Their functional design requires the parts and materials to hold up under conditions which they were never meant to tolerate. The results: leaks, corrosion, stiff handle.
It’s a mystery why manufacturers haven’t made significant improvements as available parts and materials have greatly improved over the last sixty years. People have no other choice so they keep buying them. So, companies keep making them. It’s a vicious cycle.
That brings us to today & the EnduraEase Hydrant:
Better parts, better materials and a better functional design have resulted in a more dependable and easy-to-use hydrant.
To prove it to myself and for you I spent over five years in development and testing, using it in real-life situations.
Four major considerations have been addressed:
1.a completely different configuration of valve is used than what’s in traditional hydrants,
2.the materials used in the pathway to carry water do not react when exposed to water,
3.the steel valve control rod, which would corrode and degenerate when directly exposed to water, is completely isolated from water, and
4.there are NO RUBBER “o” rings or seals, including in the valve, thus eliminating all the problems from the wear and tear on rubber found in traditional hydrants.
You can probably guess the positive practical results in daily use.
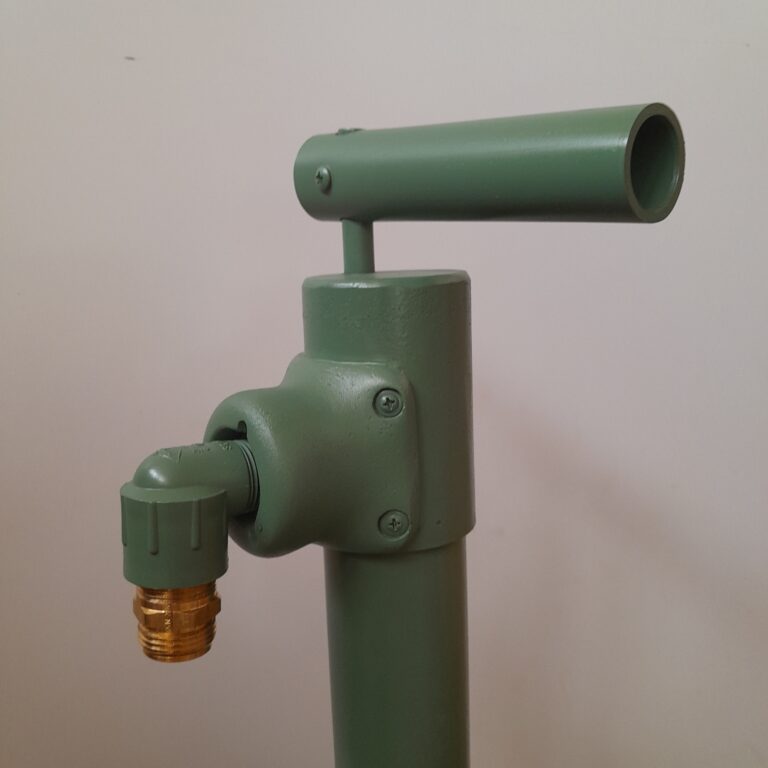
You can see by the photo that the handle moves side to side instead of up and down. The effect is that anyone with weak / painful hands can easily turn the hydrant handle “on” and “off” in just a quarter turn. Over time the movement of the handle remains easy. It doesn’t stiffen as in traditional hydrants.
There’s no leaking around the top compression gasket, because there is no compression gasket. It’s not needed. That means you don’t have to tighten down a compression nut until it won’t tighten any more, then finally spend money on a kit, with more parts than what you need, if it has the right part at all.
The valve control rod doesn’t deteriorate from corrosion and eventually fail from frequent or prolonged immersion in water, because it’s never immersed in water. It doesn’t touch water. So, you don’t have to dig up the hydrant and either replace the hydrant or the control rod.
You don’t have to worry about failure of the steel water delivery tube due to a thinned wall caused by corrosion from prolonged or frequent exposure to water. The water delivery tube is made of material which doesn’t degrade with exposure to water.

You can use the hydrant with or without the brass alloy hose adapter, and with or without the “street elbow”, a 90 degree elbow fitting. This photo shows it without the elbow.
Other Considerations:
This hydrant minimizes wasted water when the hydrant is shut off and the water drains out. This is because the tube which carries water inside the EnduraEase Hydrant is more closely matched in size to the size of the smallest component in the water pathway, the hose adapter. In traditional hydrants the water pathway is an 1 1/2″ or 1 1/4″ diameter steel tube, but at the end it’s still limited by the smaller size of the hose adapter. There really is no need for this larger tube to carry water, thus reducing the water wasted when the hydrant is shut off and the water drains out.
Last but certainly not least is appearance. The EnduraEase Hydrant has a clean pleasing appearance appropriate for use anyplace, from a barnyard to a finely landscaped yard. If you want it to be aspecific color, simply paint it.
A beneficial lesson learned from traditional hydrants:
The brass alloy used in the valve of traditional hydrants is very resistant to degradation from contact with water. So, even though the valve configuration in this hydrant is a completely different than in traditional hydrants, it’s made of the same type of brass alloy, which has proven to be very reliable.
Water flow control:
The valve in this hydrant is NOT intended to regulate the volume of water flow. You use it is either completely on or completely off! The volume of water flow is controlled by whatever device you attach to the hydrant, like a hose with a nozzle.
top of page

This handle provides comfort and ease of use.
I tried many other more “sophisticated” and stylish options for the handle shape but came back to the simplicity of the short tubular handle because of how well it works and how good it feels.
It’s UV protected schedule 40 PVC conduit, six inches long.
Comment : we’ve never hand a problem with any type of insect using the inside of the handle for a home. But if that’s a concern, just poke some cheap steel wool in it or even use a bit of expanding foam.
What’s it made of?
- The outside tube of the hydrant is made of rigid, UV protected 2″ diameter PVC conduit with 3/16″ thick walls. It’ll withstand just about any type of common use and abuse.
- The handle is UV protected PVC conduit. Strong, simple, comfortable.
- The valve housing (top and bottom sections), the water outlet saddle, and the cap section of the hydrant are made of UV protected urethane with wall about 3/16″ thick.
- The inside tube, which carries the water, is 3/4″ flexible PVC reinforced with poly fiber.
- The valve control rod is made of solid steel but is completely isolated from contact with water, virtually eliminating degeneration from corrosion.
- The brass ball valve, with a stainless steel ball, and seals made of a solid Teflon type material is what opens and closes the flow of water. The hose adapter is brass.
- There’s NO RUBBER “o” rings or seals to go bad and cause problems.
- The EnduraEase Hydrant works well a pressure as low a 20 psi. We use 30 to 60 psi. 90 psi shouldn’t be a problem. High pressure is unnecessary and hard on all plumbing components.
The EnduraEase Hydrant is dependable.
Take some time to investigate the strength and suitability of PVC and urethane for this type of application. Steel is not the best choice. It corrodes then weakens from deterioration when exposed frequently or for prolonged periods to water and soil.
Please use common sense in locating any type of hydrant. Put it where it can’t get run over by a vehicle and where stock can’t get at it.
How deep can it be buried?
The EnduraEase Hydrant measures about 47 inches from the bottom of the valve housing to the water outlet. So, you can bury the standard length hydrant up to a depth of 30″ and still have room to place a five gallon bucket underneath the water outlet.
If you need something longer for a deeper bury depth, it can be made, but expect an additional charge. I require a written agreement and deposit before any custom work begins.
For any yard hydrant used in an area of the country with seasonal freezing:
The bottom of the hydrant, where the valve is located, needs to be buried below the frost penetration line. This depth varies depending on the area where you’re using it. See the map below for a general idea.
This map shows general frost penetration depths across the continental USA. For anyone who buys any frost proof yard hydrant, check with your local building department to make sure of the specific bury depth you need.

A Note About Stabilizing Your Hydrant:
When you install your yard hydrant keep in mind where you’re going to locate it and how you’re going to use it. With frequent use and lots of rough treatment it’s a good idea to stabilize it, not just put it into the ground free standing. Some people use cement, but that makes any future changes very difficult. I do not recommend it.
DO NOT drive a t-post into the ground right up against the outer protective tube of the hydrant. At the bottom the valve housing flares out. Pounding a hole through it with a t-post will damage the housing and may also damage the valve itself. If you do this NOTHING IS COVERED by warranty.
Frequent use without stabilizing it, no matter the type of yard hydrant, including this hydrant, is more likely to lead to problems. This is especially true in soil which doesn’t compact well. The photo below shows one way of stabilizing a hydrant which works well. Other methods work just as well and may look cleaner.
Detailed installation and use instructions for this hydrant are included on the purchase/warranty receipt you receive with the hydrant. Much of it applies to the installation of almost any frost proof yard hydrant.
top of page
The story behind this hydrant:
In short, the final straw was my wife’s hands. They got to the point where she could not raise and lower the handle of the old traditional pump-handle style hydrant because of pain and weakness inn her hands when she tried. But let’s back up a bit.
It’s exciting to move onto a bare piece of land with just a dream in hand. Then it turns into work. Once you have animals, there’s feeding and watering, and everything else that goes into taking good care of them. There’s the big garden. There’s also a small orchard, if forty-eight fruit trees is all that small for a “small” place.
Everything human, animal, and plant needs water. Water for the house is one thing, and it has it’s own set of challenges. Water for the animals and plants is something else entirely.
To get water close to where we need it we use frost proof yard hydrants. Like everyone else in our shoes, we purchased and installed the old fashioned ones with the pump-handle style handles, the ones that raise up to open and push down to shut off.
It wasn’t long before the hydrants started to leak around the compression gasket at the top, around the valve control rod. There’s no problem getting water. It’s just a nuisance. For a few times you can tighten down the nut on the compression gasket to stop the leak, or at least slow it down. So everything is fine for a while, but it gets worse with use over time.
The hydrant in our barn gets turned off and on four to six times a day, mostly in the morning. The one for the garden and orchard basically is turned on in the spring and off in the fall, but only has water flowing to irrigate specific places at specific times. The one for the buck pen is turned off and on once a day. The one located half way between the house and the well is used maybe twice a week during the spring and summer. In short, we use our frost proof yard hydrants in a number of places and in different ways throughout the year.
After a while the hydrants which are turned off and on the most and the ones which are turned off and on the least start to have problems, although different types.
The hydrant in the barn stopped working properly on a couple of different occasions and I had to dig it up to fix it. In the process I discovered that the rod connecting from the handle at the top to the valve at the bottom was corroded so badly it wouldn’t be long before it failed. The inside of the main pipe was so rusted it probably wouldn’t be long before it also failed. (The repair man at the local hardware store said he commonly found the same things when people brought in their yard hydrants to get fixed.)
The hydrant for the garden and the orchard, after being left off during the fall and winter, was so stiff that my wife had a very difficult time even trying to turn it on. It got to the point where she couldn’t. I had to do that for her.
So, I finally gave up trying to fix the old style hydrants and started looking for a better way to build a yard hydrant. In casual conversation with a neighbor one afternoon he made a comment wondering why smaller water lines didn’t have a mechanism to turn the valve on and off like larger city water lines.
The valve is a simple one which you turn by using a long rod with a forked end that inserts into openings on the valve handle. You reach down into the hole, where the valve is located, insert the protrusions on the end of the rod into the valve handle and turn. With that idea, the direction for the development of a new type of frost proof yard hydrant began in earnest.
Such a simple idea, right? It turned out not to be as simple as it might seem to solve all the problems to make that simple idea into something simple and reliable.
After many ideas have been tried and tested using many prototypes there is now a frost proof hydrant which eliminates virtually all the problems of the old style hydrants, and has additional benefits. It’s the EnduraEase Hydrant. Please give it a try.
top of page
One way to stabilize your hydrant.
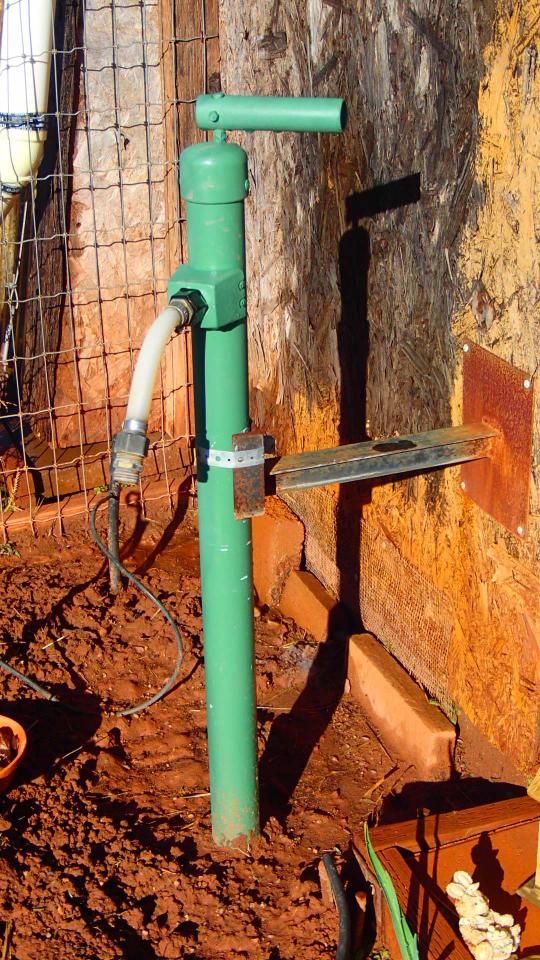
This is an earlier model of the EnduraEase Hydrant installed next to the garlic bed. You can see the stabilizing arm attached to the building.
top of page